

FC 26 Ultimate Guide: Evolutions, PlayStyles & The Next Meta Shift

Today’s news cycle for FC 26 is one of the biggest system leak discussions we’ve seen so far—and it all revolves around Evolutions, PlayStyles, and a potential full gameplay identity overhaul. Let’s break it down into what’s confirmed, what’s being tested, and what it could mean for the future meta.

NEW “RESET EVOLUTIONS” SYSTEM (IN TESTING)

One of the most surprising leaks is a reset function for Evolutions.

What it likely does:

· Remove Evolution upgrades from a player

· Potentially remove PlayStyles added through EVOs

· Possibly restore a card to a previous evolution stage

· May allow tradeability to return after reset

Why this matters:

This completely changes how Evolutions work:

· No more “locked forever” upgrades

· Experimentation becomes possible

· Meta cards could be reworked repeatedly

If implemented fully, this is basically a “build your player freely” system instead of permanent decisions.

PLAYSTYLES ARE OFFICIALLY STAYING IN FC 26

One of the biggest confirmations:

· PlayStyles are NOT going anywhere

· They are expanding

· They are being tested heavily via EA Sports FC Mobile updates

Mobile already added:

· New PlayStyles

· Reworked PlayStyle logic

· Additional hidden traits not yet in console

This is widely seen as a direct preview of FC 26’s system. As you prepare for the new meta and building your ultimate squad, you can buy FUT 26 Coins to get a head start on top-tier players and PlayStyle-enhanced cards.

NEW PLAYSTYLE SYSTEM (LEAKED STRUCTURE)

The leaked system shows a major overhaul.

Core mechanics:

· Equip / Unequip PlayStyles

· Dismantle PlayStyles

· Upgrade PlayStyles using duplicates

· PlayStyle “store” system

Multi-tier system (VERY IMPORTANT):

· Up to 4 levels per PlayStyle 

o Base

o Level 2

o Level 3

o Level 4 (PlayStyle+ equivalent tier)

WHY THIS IS A MASSIVE DEAL

This changes everything:

Current problem:

· One PlayStyle = fixed value

· No flexibility

· Cards feel “pre-determined meta or useless”

Future problem risk:

· Power creep becomes extreme

· Early-game cards may feel irrelevant instantly

· Store-based PlayStyles could become pay-driven meta boosts

NEW PLAYSTYLE TYPES (LEAKED LIST)

Here are some of the newly surfaced or renamed PlayStyles:

Goalkeeper

· Deflector

· Rush

· Whipped Crosser

Physical

· Physical Intimidator

· Relentless Stamina Accelerator

Defending

· Aerial Defense

· Hard Tackle Master

· Stand Tackle Master

· Slide Tackle specialist

Passing

· Bullet Pass

· Tiki Taka

Dribbling

· Speed Dribbler

· Trickster

Finishing (NEW BIG CHANGES)

· Clinical Finisher

· Finesse Shot Master

· First Timer

· Penalty Expert (NEW & controversial) 

· Power Shot Master

THE BIGGEST CONTROVERSY: “PENALTY EXPERT”

This new PlayStyle raises serious gameplay concerns:

Potential effects:

· Increased penalty accuracy

· Reduced save chance even on correct guess

· Possible RNG interaction changes

Community concern:

If not carefully balanced:

· Penalties become pay-to-win or RNG-heavy

· Competitive integrity in shootouts could suffer

META IMPACT: WHAT CHANGES IN FC 26?

1. Cards become harder to evaluate

You won’t just look at:

· Pace

· Shooting

· Passing

You’ll now NEED to check:

· PlayStyle tier

· Upgrade level

· Whether PlayStyles are removable

2. Market instability risk

If PlayStyles can be removed:

· Tradeable cards could shift in value repeatedly

· EVO market could crash or spike unpredictably

3. “Perfect cards” become more complex

Instead of: “Is this card good?”

It becomes: “Is this card good AND does it have the right PlayStyle tier setup?”

COMMUNITY REACTION SUMMARY

The sentiment is split:

Optimistic take:

· More customization

· More depth

· More long-term progression

Concerned take:

· Overcomplicated systems

· Pay-to-win store risk

· Power creep acceleration

· Reduced balance at launch

WHAT THIS MEANS FOR FC 26 META

If these systems launch as leaked:

Early game:

· Gold cards weaker than ever

· PlayStyles heavily define usability

Mid game:

· EVO resets create shifting meta builds

· Duplicate farming becomes valuable

End game:

· Fully optimized PlayStyle builds dominate everything

FINAL THOUGHTS

FC 26 is shaping up to be less about raw stats and more about: “Who has the best PlayStyle build + Evolution structure?”

The direction is clear:

· More systems

· More customization

· More monetization potential

· Higher gameplay complexity

Whether that becomes innovation or overload depends entirely on execution. To stay ahead in this evolving meta without breaking the bank, you can buy cheap EA FC 26 Coins from MMOEXP—a trusted platform offering fast, affordable, and reliable delivery to help you build your ultimate squad with ease.
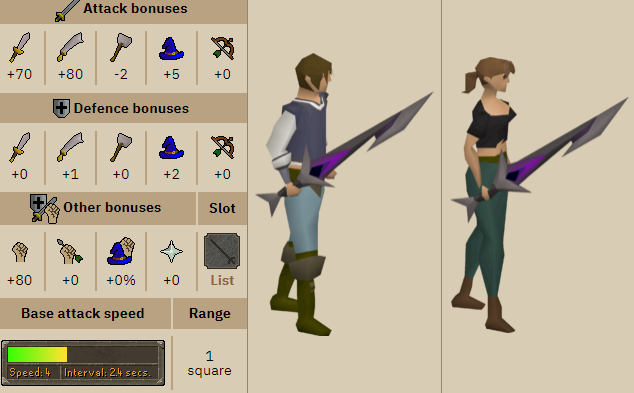
OSRS Primordial Boots Guide: Best-in-Slot Strength, PvE Performance, and Upgrade Value

Primordial Boots are widely regarded as the best-in-slot melee boots in Old School RuneScape. Designed purely for damage output, they offer unmatched Strength bonuses and solid defensive stats, making them a cornerstone of endgame melee builds. If you’re aiming to maximize efficiency, improve boss kill speeds, and grow your OSRS gold stack through PvM, Primordial Boots are one of the most important upgrades to consider.

This guide breaks down why these boots are so valuable, where they excel, and whether they’re worth the investment for your account.

What Makes Primordial Boots Special?

Primordial Boots stand out for one simple reason: pure stat efficiency.

Key features include:

·Best-in-slot Strength bonus for boots

·Strong defensive stats

·Designed specifically for melee builds

·No special effects-just raw performance

Unlike hybrid or utility boots, Primordial Boots focus entirely on increasing your melee damage. They don’t add flashy mechanics or niche bonuses, but what they do offer is consistent and reliable DPS improvement across nearly all melee content.

Why Strength Bonus Matters So Much

At first glance, the Strength bonus on Primordial Boots might not seem game-changing. However, in OSRS, even a small increase in Strength can have a major impact.

1. Increased Max Hit

Every point of Strength bonus contributes to your maximum hit. When combined with:

·High-level weapons

·Armor like Bandos

·Prayers such as Piety

This results in noticeably higher damage output. Over time, that translates into:

·Faster boss kills

·More efficient Slayer tasks

·Higher profit per hour

2. Consistent DPS Gains

Unlike items that rely on special effects or situational bonuses, Primordial Boots provide constant value. Every attack benefits from the added Strength, making your overall DPS more consistent.

3. Endgame Optimization

For players chasing efficiency, Primordial Boots are often one of the final upgrades in a maxed melee setup. They may not change your playstyle, but they refine your performance, turning good setups into optimal ones.

Best PvE Uses for Primordial Boots

Primordial Boots shine in PvE environments where sustained melee damage is key.

Common Use Cases

·Slayer tasks and Slayer bosses

·God Wars Dungeon

·Chambers of Xeric

·Tombs of Amascut

·General boss farming

In these scenarios, the extra Strength bonus compounds over time. Longer fights benefit the most, as every additional point of damage adds up across hundreds of attacks.

For players focused on farming bosses and building their OSRS gold reserves, this increased efficiency can significantly boost long-term profits.

PvP Viability: Situational but Usable

While Primordial Boots can be used in PvP, they are less common compared to PvE.

Why?

PvP setups often prioritize:

·Mobility

·Hybrid stats

·Risk management

However, in certain situations-such as controlled fights or low-risk environments-Primordial Boots can still be effective for melee-focused builds. Their defensive stats also provide better survivability than lighter alternatives.

That said, they are not a staple PvP item and are generally outclassed by more versatile gear choices in high-risk combat.

Primordial Boots vs Other Melee Boots

When compared to other options, Primordial Boots clearly lead in damage output.

Dragon Boots

·Solid mid-game option

·Lower Strength bonus

Guardian Boots

·High defensive stats

·Minimal offensive value

Bandos Boots

·Decent alternative

·Still weaker in DPS

For players focused on maximizing melee damage, Primordial Boots are the undisputed best choice.

Cost and Investment Considerations

Primordial Boots are an endgame item, and their price reflects that.

Acquiring them typically requires a large amount of OSRS gold, which players earn through:

·Bossing and raids

·High-level Slayer

·Grand Exchange flipping

Because of their cost, many players prioritize core upgrades first, such as weapons and armor, before investing in Primordial Boots.

Should You Buy Primordial Boots Early?

For mid-game players, the cost may outweigh the immediate benefits. However, once you reach late-game content, they become one of the most efficient upgrades available.

Some players choose to accelerate their progression by exploring options to buy OSRS gold through trusted marketplaces. This approach can help skip long grinding sessions and allow faster access to high-end gear like Primordial Boots.

Of course, whether you grind or invest, the key is aligning your progression with your personal goals and playstyle.

Requirements and Ideal Setup

Primordial Boots are best used on accounts that already have:

·High Attack and Strength levels

·Strong melee weapons (e.g., Abyssal or raid-tier gear)

·Endgame or near-endgame armor setups

For lower-level players, the upgrade may not feel impactful enough to justify the cost. But for advanced players, they are a natural and valuable addition to a maxed melee build.

Are Primordial Boots Worth It?

For most melee-focused players, the answer is yes, eventually.

Pros:

·Best-in-slot Strength bonus

·Consistent DPS improvement

·Useful in nearly all PvE content

Cons:

·High cost

·No special effects or unique mechanics

They may not be flashy, but they deliver exactly what melee builds need: more damage, all the time.

Final Thoughts

Primordial Boots perfectly represent OSRS gear design: simple, powerful, and impactful. Without relying on gimmicks or special abilities, they provide a straightforward but meaningful upgrade that improves performance across the board.

Whether you’re farming bosses, pushing raid efficiency, or completing your endgame setup, these boots are one of the most reliable investments you can make with your OSRS gold.

And for players looking to reach that level faster, choosing to buy OSRS gold responsibly through reputable sources can help bridge the gap between time investment and high-tier gear, letting you focus on what really matters: mastering the game and maximizing your results.

ARC Raiders:How to Locate a Water Pump Fast

In ARC Raiders, Water Pumps used to be one of those items you barely paid attention to. Most players would either sell them for a modest amount of Coins or break them down into basic crafting materials. But with the introduction of the Weather Monitor project, that has changed completely—Water Pumps are now a key progression item.

If youve been having trouble tracking one down, youre definitely not alone. Theyre small, easy to miss, and dont spawn as frequently as other materials. This guide will walk you through the fastest farming locations, efficient looting paths, and how to approach the grind without wasting time.

Previously, Water Pumps were just filler loot. Now, theyre required for one of the Weather Monitors upgrade stages, alongside:

Duct Tape
Rusted Bolts
Wasp Drivers

Out of all these components, Water Pumps are by far the most inconsistent to find. Duct Tape and Rusted Bolts appear regularly in industrial areas, and Wasp Drivers drop from enemies—but Water Pumps rely heavily on luck and careful searching.

Best Maps for Water Pump Farming

If you want to maximize your chances, focus only on areas with strong mechanical or industrial loot pools. Two maps stand out:

Dam Battlegrounds
Spaceport

Each offers multiple high-density loot zones where Water Pumps can spawn.

Dam Battlegrounds:Reliable Farming Spots

This map is packed with industrial buildings, making it one of the best places to hunt for Water Pumps.

Power Generation Complex

A top-tier farming location with a wide variety of containers. Check every:

Metal crate
Tool cabinet
Shelf
Locker

This area often attracts other players, so move cautiously and clear threats before looting.

Controlled Access Zone

Even without solving its puzzle, this area is worth exploring. Water Pumps have been spotted:

Inside red lockers
On maintenance walkways
In metal storage containers

Dont ignore vertical sections or flooded areas—valuable loot can be tucked away in unexpected spots.

Primary Facility

A dense industrial structure filled with mechanical loot sources. Focus on:

Utility rooms
Maintenance areas
Storage closets

Take your time here—Water Pumps can easily blend into clutter.

Water Treatment Control

One of the most logical spawn locations. If youre prioritizing efficiency, this should be high on your route.

Look carefully at:

Tables
Storage bins
Nearby crates
Spaceport:High-Yield Industrial Zones

Spaceport is another excellent option, especially if you prefer a different route or less competition.

Shipping Warehouse

A hotspot for mechanical loot. Search:

Pallet racks
Tool stations
Crates
Fuel Control

These compact rooms often hide valuable items on shelves or inside cabinets.

Rocket Assembly

Large interiors with multiple loot opportunities. Be sure to check:

Workbenches
Equipment containers
Side rooms
Container Storage

Stacked containers may contain hidden compartments with valuable loot.

Vehicle Maintenance

Garages and repair bays are some of the best places for mechanical spawns.

Search thoroughly:

Red lockers
Toolboxes
Under shelves
How to Recognize a Water Pump

One of the biggest challenges isnt finding the right area—its actually spotting the item.

Water Pumps are:

Small and metallic
Often partially hidden
Easy to overlook in clutter

They can appear:

On tables or shelves
Inside lockers or crates
Sitting loosely on boxes

Slow down when looting and scan surfaces carefully, especially in darker interiors.

Efficient Farming Tips

If youre specifically targeting Water Pumps, optimizing your runs makes a huge difference:

Stick to Low-Conflict Routes

Avoid heavily contested zones if your goal is farming materials rather than PvP.

Focus Only on Industrial Areas

Residential and commercial zones rarely spawn mechanical components, so skip them entirely.

Manage Your Inventory

Bring a medium-capacity backpack so you can carry additional valuable items while searching.

Should You Buy or Farm?

While Water Pumps can occasionally appear through trading or markets, farming them yourself is usually the better option. Spending Coins on this item isnt very efficient when those resources could go toward more impactful upgrades.

Instead, save your currency for long-term progression—especially when preparing to unlock or buy ARC Raiders BluePrints.

Why Completing the Weather Monitor Matters

Although the Water Pump requirement can feel like a bottleneck, finishing this stage is well worth the effort. Progressing the Weather Monitor:

Advances your base development
Grants passive benefits
Improves overall efficiency

Farming Water Pumps in ARC Raiders comes down to patience, map knowledge, and attention to detail. Stick to industrial zones, follow efficient routes, and take your time scanning loot carefully.

While searching, continue collecting other valuable buy ARC Raiders Items to build your stash. The effort you put in now will pay off later when youre ready to upgrade your gear and invest in high-tier BluePrints.

ARC Raiders Firefly and Comet Guide: How to Counter the New Deadly ARC Machines

Two powerful ARC machines have landed topside in ARC Raiders, dramatically shifting the combat meta for players exploring the surface. Unlike earlier ARC units that rewarded predictable cover-based tactics, the Firefly and Comet introduce aggressive mechanics that force Raiders to adapt quickly. Their unique abilities punish careless positioning, slow reactions, and poor loadout choices.

If you want to protect your hard-earned ARC Raiders Items and survive high-risk surface encounters, understanding how these new enemies behave is critical. This guide breaks down the most effective strategies for defeating the Firefly and Comet so you can stay alive, secure valuable loot, and continue progressing through the game.

Firefly Guide – How to Beat the Flying Flame Hunter

The Firefly is one of the most dangerous airborne ARC units introduced so far. Unlike Wasps or Hornets that hover at manageable distances, the Firefly is relentless. It aggressively tracks players, applies constant pressure, and uses devastating flame attacks to flush the Raiders out of cover.

Why the Firefly Is So Dangerous

The Firefly’s threat comes from its relentless tracking and powerful area denial attacks. Its primary advantages include:

·Aggressively tracking Raiders across terrain

·Sustained flamethrower damage

·Punishing open-field movement

·Effective corner and cover pressure

Treating the Firefly like a standard flying ARC unit is a mistake that often leads to quick defeat. Instead, players need to rely on precise tactics and positioning.

Use a Photoelectric Cloak to Break Aggro

One of the most effective tools against the Firefly is the Photoelectric Cloak. This utility device temporarily disrupts ARC targeting systems, rendering the user invisible for a short duration.

Why it works so well:

·Fireflies rely heavily on tracking behavior

·Cloaking combined with line-of-sight breaks forces a reset

·It provides breathing room during intense engagements

If you are under heavy pressure and your health is low, activating the cloak can be safer than trying to out-damage the Firefly directly.

Shoot the Yellow Gas Tank Weak Spot

The Firefly’s flamethrower relies on an exposed fuel system. Look carefully for the yellow gas canister mounted on its frame.

Tips for hitting the weak point:

·Wait for the Firefly to hover before firing

·Use precision weapons with controlled bursts

·Focus on accuracy rather than spraying bullets

Destroying this fuel tank can eliminate the Firefly quickly, saving ammunition and preventing extended burn damage.

Avoid Running in Open Terrain

Running across open terrain while a Firefly is active is extremely dangerous.

Fireflies will:

·Dive aggressively toward fleeing players

·Exploit long sightlines

·Track movement efficiently

Instead of sprinting across open areas, move into nearby buildings or solid structures. Indoor environments reduce the Firefly’s maneuverability and make it easier to land weak-point shots.

Use Lure Grenades for Tactical Breathing Room

When fighting multiple ARC units or dealing with overwhelming pressure, Lure Grenades can redirect enemy attention.

Best scenarios for using lure grenades include:

·When fighting multiple ARC machines simultaneously

·During teammate revives

·When preparing for extraction

While this tactic does not eliminate the Firefly, it can buy crucial time to reposition or reload.

Comet Guide – How to Survive the Rolling Explosive ARC

While the Firefly focuses on aerial pressure, the Comet represents brute force. This heavily armored ARC unit charges across the battlefield before detonating in a massive explosion.

If players remain too close when it explodes, the fight can end instantly.

Why the Comet Is So Lethal

The Comet’s power comes from its explosive potential and heavy armor. Key traits include:

·Massive explosive damage radius

·Thick armor plating

·Intelligent squad targeting

·Self-destruction mechanics

Unlike other ARC enemies that chip away at your health, the Comet is designed to deliver one devastating burst of damage.

Trigger the Weak Point From a Distance

When the Comet is engaged from range, its shell opens slightly and exposes an inner core.

Effective strategy:

·Engage from medium or long distance

·Wait for the shell to open

·Focus fire on the exposed core

This vulnerability window is your best opportunity to deal significant damage.

Use High Fire Rate Weapons

Against the Comet, weapon speed is more important than single-shot power.

Automatic weapons are especially effective because they can rapidly exploit short vulnerability windows. Consider using:

·SMGs

·Assault rifles

·High-fire-rate carbines

These weapons provide sustained damage output that can overwhelm the Comet before it reaches detonation range.

Spread Out During Squad Combat

The Comet is designed to punish clustered players. If your squad stays grouped, the enemy will roll directly into the center before detonating.

To prevent a full squad wipe:

·Maintain spacing between teammates

·Form a loose perimeter around the target

·Avoid stacking objectives or cover

Proper spacing turns a potential team wipeout into a manageable revive situation.

Target the Side Armor Panels

The Comet’s front armor is extremely thick, but its side panels are more vulnerable.

Combat tips include:

·Circle-strafe whenever possible

·Focus fire on the side armor plating

·Coordinate with teammates to attack from multiple angles

Removing armor panels exposes the core more frequently and significantly shortens the fight.

Stay Calm During a Charge

If a Comet begins charging directly toward you, panic is the worst possible reaction.

A more advanced tactic involves:

·Holding position briefly

·Shooting the front weak point during the charge

·Dodging at the last possible moment

This maneuver is risky but can deal major damage if executed correctly.

Loadout Strategy for Fighting High-Level ARC Units

With Firefly and Comet units now active on the surface, Raiders must prepare flexible loadouts for survival.

Recommended equipment includes:

·Precision weapons for weak-point targeting

·Automatic weapons for vulnerability windows

·Utility tools like cloaks and lure grenades

·Balanced ammunition reserves

When farming high-risk areas, protecting valuable ARC Raiders Items becomes increasingly important. Losing upgraded gear to a Comet explosion can be far more punishing than losing basic equipment.

Players pushing deeper into endgame zones often invest time in optimized crafting setups. Others choose to buy ARC Raiders BluePrints to unlock powerful gear faster and stay competitive during difficult surface encounters.

Final Survival Tips for ARC Raiders

The introduction of Firefly and Comet enemies has fundamentally changed surface combat. Raiders must now rely on precision, adaptability, and communication to survive.

To succeed against these new ARC threats:

·Constantly adjust your positioning

·Identify weak points quickly

·Carry flexible loadouts

·Coordinate with your squad

·Avoid panic reactions during intense encounters

The Firefly demands precision shooting and intelligent use of cover, while the Comet rewards smart spacing and sustained damage output.

Master these strategies, and you will not only survive the surface-you’ll dominate it while securing the valuable loot that makes every ARC Raiders raid worth the risk.

Tips and Strategies for Solving the Serum Puzzle in BO7 Zombies

One of the most challenging objectives in Call of Duty:Black Ops 7 Zombies takes place during the Ashes of the Damned main Easter egg. The Serum puzzle requires players to locate six unique biological components scattered across the map, many of which are locked behind specific upgrades, enemy conditions, or round requirements. Once collected, these items must be used to complete a high-risk laboratory challenge that tests both survival skills and puzzle awareness.

All Serum Part Locations in Ashes of the Damned

Serum Component 1:Powder of the Forgotten

This component requires two items:Wisp Tea and the Necrofluid Gauntlet.

Wisp Tea can be purchased at Zarya Cosmodrome, or obtained for free by completing the Twins Easter egg at Vandorn Farm. Once the tea is active, travel to the Tailor Shop in eastern Ashwood, located just to the right of the Vulture Aid perk.

Inside the shop is a mirror that reacts to Wisp Tea. Simply stand close to it while the effect is active, and the mirror will shatter. Afterward, equip the Necrofluid Gauntlet and shoot the broken mirror to cause the Powder of the Forgotten to drop.

Serum Component 2:Widow Lantern

Make your way to Blackwater Lake and enter the cabin nearby. Go downstairs into the kitchen and open the sink cabinet along the south wall to retrieve the Jar of Spores.

Next, bring the jar to Vandorn Farm. Just outside the main gate, you’ll find a dead horse covered in fungal growth. Interact with it to plant the spores. After three full rounds, the spores will fully mature, allowing you to collect the Widow Lantern.

Serum Component 3:Mysterious Limb

This item is tied to Zursa, the Elite zombie bear enemy that begins spawning from Round 16 onward.

To obtain the Mysterious Limb, Zursa must be killed using Ol’ Tessie’s Abomination Head Beam Attack. First, unlock the Abomination Head upgrade by visiting Reba Diner at Exit 115. Defeat the Cook zombie, collect the Freezer Key, and complete the Ol’ Tessie upgrade process in Ashwood.

Once Zursa appears, weaken her with standard weapons. When her health is low, finish her with the Beam Attack. If done correctly, she will explode and drop the Mysterious Limb.

Serum Component 4:Ravager Eyes

Ravagers are fast, four-legged enemies that can spawn randomly or during Max Ammo rounds. When one appears, lure it toward a Saw Blade trap, such as the one located outside the Barn at Vandorn Farm.

Activate the trap for 2,000 Essence and allow it to kill the Ravager. Upon death, it will automatically drop the Ravager Eyes.

Serum Component 5:Hoard Husk Chunks

This component also requires Ol’ Tessie to be equipped with the Abomination Head upgrade.

Drive Ol’ Tessie along the interconnected roadways and look for purple-glowing plants, which spawn at random locations. When you spot one, use the Beam Attack to destroy it. Doing so will cause the Hoard Husk Chunks to drop.

Be extremely cautious when exiting Ol’ Tessie after collecting the item, as zombie aggression in these areas is significantly increased.

Serum Component 6:Human Bones

Travel to the Barn at Vandorn Farm. You will need both a Combat Axe and a Molotov, both of which can be obtained for free.

The Combat Axe can be found in the Reba Diner kitchen, while Molotovs can either be crafted inside the Barn or picked up near Ol’ Tessie’s garage. Inside the Barn, locate the hanging corpse in the center of the room.

Throw the Combat Axe at the corpse’s right foot to sever it. Once it drops to the floor, throw a Molotov onto it. After the flames extinguish, you can collect the Human Bones.

After gathering all six Serum components, head to Yuri’s Lab, located southwest of Zarya Cosmodrome. Inside the lab, you’ll see six bowls arranged around the room, each holding one of your collected items, along with a chemistry station at the center.

Begin the sequence by interacting with the Powder of the Forgotten, which is placed in the fifth bowl. This triggers a lockdown and fills the room with smoke. Once the smoke clears, three Pigpen cipher symbols will appear on the chalkboard.

These symbols indicate the order in which the remaining bowls must be activated, starting with the top symbol, followed by the middle, and then the bottom.

During the lockdown phase, health regeneration is disabled. The only way to recover health is by using the Necrofluid Gauntlet siphon ability, which drains life from zombies when firing and reloading. Survive the lockdown while activating the bowls in the correct order to complete the Serum puzzle.

Practicing this entire process in Black Ops 7 Bot Lobbies is highly recommended, particularly for solo players. Bot lobbies allow you to rehearse timing-sensitive steps—such as the Zursa kill or the lab lockdown—without the added pressure of public matches. Some players even opt to buy CoD Black Ops 7 Bot Lobbies specifically to master Easter egg mechanics safely.

While the Serum puzzle may seem overwhelming at first, understanding each requirement turns it into one of the most reliable and repeatable steps in Ashes of the Damned. With preparation and patience, it becomes far less intimidating and far more rewarding.