
OSRS Primordial Boots Guide: Best-in-Slot Strength, PvE Performance, and Upgrade Value

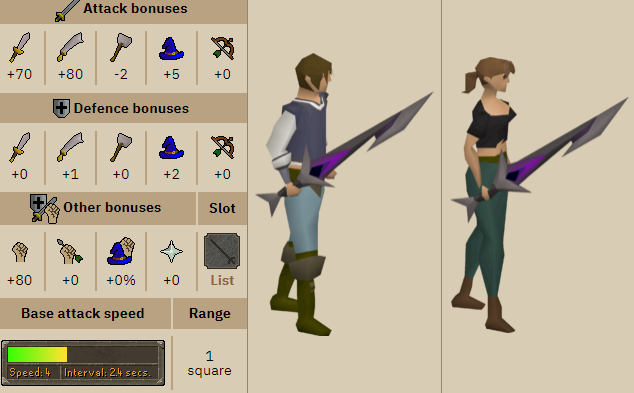
Primordial Boots are widely regarded as the best-in-slot melee boots in Old School RuneScape. Designed purely for damage output, they offer unmatched Strength bonuses and solid defensive stats, making them a cornerstone of endgame melee builds. If you’re aiming to maximize efficiency, improve boss kill speeds, and grow your OSRS gold stack through PvM, Primordial Boots are one of the most important upgrades to consider.

This guide breaks down why these boots are so valuable, where they excel, and whether they’re worth the investment for your account.

What Makes Primordial Boots Special?

Primordial Boots stand out for one simple reason: pure stat efficiency.

Key features include:

·Best-in-slot Strength bonus for boots

·Strong defensive stats

·Designed specifically for melee builds

·No special effects-just raw performance

Unlike hybrid or utility boots, Primordial Boots focus entirely on increasing your melee damage. They don’t add flashy mechanics or niche bonuses, but what they do offer is consistent and reliable DPS improvement across nearly all melee content.

Why Strength Bonus Matters So Much

At first glance, the Strength bonus on Primordial Boots might not seem game-changing. However, in OSRS, even a small increase in Strength can have a major impact.

1. Increased Max Hit

Every point of Strength bonus contributes to your maximum hit. When combined with:

·High-level weapons

·Armor like Bandos

·Prayers such as Piety

This results in noticeably higher damage output. Over time, that translates into:

·Faster boss kills

·More efficient Slayer tasks

·Higher profit per hour

2. Consistent DPS Gains

Unlike items that rely on special effects or situational bonuses, Primordial Boots provide constant value. Every attack benefits from the added Strength, making your overall DPS more consistent.

3. Endgame Optimization

For players chasing efficiency, Primordial Boots are often one of the final upgrades in a maxed melee setup. They may not change your playstyle, but they refine your performance, turning good setups into optimal ones.

Best PvE Uses for Primordial Boots

Primordial Boots shine in PvE environments where sustained melee damage is key.

Common Use Cases

·Slayer tasks and Slayer bosses

·God Wars Dungeon

·Chambers of Xeric

·Tombs of Amascut

·General boss farming

In these scenarios, the extra Strength bonus compounds over time. Longer fights benefit the most, as every additional point of damage adds up across hundreds of attacks.

For players focused on farming bosses and building their OSRS gold reserves, this increased efficiency can significantly boost long-term profits.

PvP Viability: Situational but Usable

While Primordial Boots can be used in PvP, they are less common compared to PvE.

Why?

PvP setups often prioritize:

·Mobility

·Hybrid stats

·Risk management

However, in certain situations-such as controlled fights or low-risk environments-Primordial Boots can still be effective for melee-focused builds. Their defensive stats also provide better survivability than lighter alternatives.

That said, they are not a staple PvP item and are generally outclassed by more versatile gear choices in high-risk combat.

Primordial Boots vs Other Melee Boots

When compared to other options, Primordial Boots clearly lead in damage output.

Dragon Boots

·Solid mid-game option

·Lower Strength bonus

Guardian Boots

·High defensive stats

·Minimal offensive value

Bandos Boots

·Decent alternative

·Still weaker in DPS

For players focused on maximizing melee damage, Primordial Boots are the undisputed best choice.

Cost and Investment Considerations

Primordial Boots are an endgame item, and their price reflects that.

Acquiring them typically requires a large amount of OSRS gold, which players earn through:

·Bossing and raids

·High-level Slayer

·Grand Exchange flipping

Because of their cost, many players prioritize core upgrades first, such as weapons and armor, before investing in Primordial Boots.

Should You Buy Primordial Boots Early?

For mid-game players, the cost may outweigh the immediate benefits. However, once you reach late-game content, they become one of the most efficient upgrades available.

Some players choose to accelerate their progression by exploring options to buy OSRS gold through trusted marketplaces. This approach can help skip long grinding sessions and allow faster access to high-end gear like Primordial Boots.

Of course, whether you grind or invest, the key is aligning your progression with your personal goals and playstyle.

Requirements and Ideal Setup

Primordial Boots are best used on accounts that already have:

·High Attack and Strength levels

·Strong melee weapons (e.g., Abyssal or raid-tier gear)

·Endgame or near-endgame armor setups

For lower-level players, the upgrade may not feel impactful enough to justify the cost. But for advanced players, they are a natural and valuable addition to a maxed melee build.

Are Primordial Boots Worth It?

For most melee-focused players, the answer is yes, eventually.

Pros:

·Best-in-slot Strength bonus

·Consistent DPS improvement

·Useful in nearly all PvE content

Cons:

·High cost

·No special effects or unique mechanics

They may not be flashy, but they deliver exactly what melee builds need: more damage, all the time.

Final Thoughts

Primordial Boots perfectly represent OSRS gear design: simple, powerful, and impactful. Without relying on gimmicks or special abilities, they provide a straightforward but meaningful upgrade that improves performance across the board.

Whether you’re farming bosses, pushing raid efficiency, or completing your endgame setup, these boots are one of the most reliable investments you can make with your OSRS gold.

And for players looking to reach that level faster, choosing to buy OSRS gold responsibly through reputable sources can help bridge the gap between time investment and high-tier gear, letting you focus on what really matters: mastering the game and maximizing your results.

OSRS Cave Combat Guide:Optimal Ranged Gear for Underground Fights

Cave encounters in Old School RuneScape can be some of the most intense and dangerous parts of your journey. Tight spaces, aggressive enemies, and multi-combat zones mean you’ll need a solid plan—and the right gear—to survive and thrive. Whether you’re slaying for profit or grinding for a pet drop, the gear you bring can make or break your cave experience.

Best Ranged Weapons for Cave Fighting

1.Toxic Blowpipe

    A staple in any ranged fighter arsenal, the Toxic Blowpipe is prized for its rapid attack speed and built-in poison damage. It uses darts as ammunition, allowing you to deal consistent damage while staying agile. The poison effect is especially handy against high-HP enemies, slowly wearing them down even as you reposition or retreat.RSgoldfast: The place for OSRS players to get the cheapest, safest and fastest OSRS gold!

    2.Rune Crossbow

      A reliable choice with high versatility, the Rune Crossbow supports a wide range of enchanted bolts. Ruby bolts (e) are perfect for burst damage against tanky targets, while Diamond bolts (e) increase effectiveness against armored foes. Its compatibility with shields makes it ideal for players who want both offense and defense.

      3.Dragon Crossbow

        An upgrade from the Rune variant, the Dragon Crossbow provides better accuracy and damage output. Like its predecessor, it benefits from specialized bolts and is a popular choice for high-level cave monsters. If you’re facing powerful foes and need a step up, this is your weapon.

        Top Ranged Armor for Cave Encounters

        1.Elite Void Knight Gear

          This is one of the best all-around ranged armor sets, thanks to its powerful damage boost. It doesn’t offer the highest defense, but for bosses or fast-paced slayer tasks where you prioritize DPS, Void is hard to beat. Ideal for multi-combat scenarios or quick kills.

          2.Armadyl Armor

            Armadyl gear is the gold standard for ranged armor. With exceptional bonuses to both ranged accuracy and defense, it’s suited for prolonged engagements with high-level monsters. Though expensive, its power makes it a worthwhile investment for serious PvMers.

            3.Crystal Armor

              When paired with the Crystal Bow or other ranged weapons, this armor grants excellent accuracy and damage. It offers decent defense, but note that it consumes special attack energy over time. Still, it shines in PvM situations where every shot needs to land hard.

              4.Karil Armor

                Karil gear offers a good balance of offense and defense, especially useful if you’re facing magic-based enemies. It’s relatively affordable and widely used in mid-level PvM content, particularly in cave environments like Barrows or Tunnels.

                Key Accessories to Enhance Performance

                1.Ava’s Assembler

                  An essential for any ranged fighter, Ava’s Assembler increases your ranged attack and helps recover ammunition. It’s lightweight and efficient, perfect for conserving supplies during extended cave runs.

                  2.Archer Ring (i)

                    This imbued ring significantly boosts your ranged accuracy and damage. Combine it with high-tier weapons like the Blowpipe or Crossbows for a noticeable DPS increase.

                    3.Necklace of Anguish

                      Arguably the best-in-slot ranged amulet, the Necklace of Anguish provides both an accuracy and strength bonus. If you’re serious about maximizing your damage output, this necklace should be at the top of your list.

                      Best Shields for Crossbow Users

                      If you’re using a crossbow-based setup, pairing it with the right shield can greatly improve your survivability.

                      1.Dragonfire Shield (DFS)

                        The DFS offers powerful protection against dragonfire and strong defensive stats overall. It’s a favorite in cave areas where dragons or fire-breathing monsters lurk.

                        2.Dragonfire Ward

                          A ranged-friendly variant of the DFS, the Dragonfire Ward provides ranged bonuses in addition to strong defense. It’s ideal for players using a crossbow setup who want both power and protection.

                          3.Odium Ward

                            While less defensive than the other options, the Odium Ward boosts your ranged attack bonus. It’s a more offensive choice and works well when defense isn’t your top priority.

                            Final Tips for Cave Ranged Combat

                            Bring Prayer Potions: Many cave encounters benefit from overhead prayers like Protect from Missiles or Piety to stay alive longer.

                            Use Stamina Potions: Especially useful for tight cave layouts that require a lot of running.

                            Consider a Dwarf Multicannon: In open cave spaces, it can speed up tasks dramatically—just check if it’s allowed in the area.

                            With the proper ranged setup, you can dominate the darkest corners of Gielinor’s underground. Whether you prefer speed with a Blowpipe or raw power with a Crossbow and elite armor, having the right loadout is key to surviving and profiting from your cave adventures.Your OSRS journey deserves the best – get affordable buy Runescape gold, fast and easy with RSgoldfast!

                            OSRS King Long Walkthrough: Stage 1 – Breaking Merlin Out

                            Old School RuneScape is packed with quests that test a player problem-solving skills, and the King Long series is no exception. One of its most memorable moments is the daring rescue of Merlin. Stage 1 of this adventure requires players to navigate the challenges of his prison break, emphasizing teamwork, strategy, and a bit of creativity.

                            Setting the Stage: Merlin Imprisonment

                            Your journey begins in Camelot, where you learn of Merlin unfortunate predicament—trapped in a secure prison cell. Your mission is clear: get him out. However, this won’t be a simple matter of picking a lock; a more unconventional approach is needed.

                            Upon reaching the prison, you’ll find Merlin locked away, with a single possible exit—a vent on the wall opposite his cell door. Observing this detail is crucial, as it serves as the key to his escape. The challenge lies in reaching it, and that’s where teamwork comes into play.

                            Executing the Escape: The Human Pyramid

                            The rescue takes a humorous and creative turn when the knights band together to form a human pyramid. This inventive method is not just entertaining to watch but also highlights the importance of cooperation in OSRS quests. Each knight plays a role in lifting Merlin toward the vent, reinforcing the game signature mix of strategy and humor.

                            Once Merlin is hoisted to the vent, you face a decision:

                            Escape with Merlin: Continue the jailbreak and make your way back to Camelot.

                            Return Him to Prison: For a lighthearted twist, players have the option to put Merlin back in his cell. Simply interact with the statue or click on the gate to reverse the escape.

                            This optional decision adds a layer of playfulness to the quest and foreshadows further encounters with the antagonist, Morgan, who won’t give up so easily.

                            Tips for Success in Stage 1

                            Pay Attention to Your Surroundings: Key details, like the vent, can be easy to miss but are vital to your success.

                            Embrace Teamwork: OSRS quests often involve collaborating with NPC, and understanding their roles can lead to creative solutions.Level up your game with instant OSRS gold from RSgoldfast. Experience unparalleled quality and customer support – your adventure starts here!

                            Evaluate Your Options: Whether you choose to escape immediately or return Merlin to his cell, taking your time to assess the situation can yield unexpected outcomes.

                            Enjoy the Story: This quest is filled with humor and charm, making it more than just a puzzle—it’s a memorable adventure.

                            Prepare for the Next Stage: This is just the beginning, and more challenges await in the “King Long” questline.Choose RSgoldfast to get instant cheap Runescape gold and level up your game. Your ultimate adventure awaits!

                            Conclusion: A Quest of Wit and Strategy

                            Stage 1 of the “King Long” quest showcases OSRS unique approach to problem-solving, blending teamwork with lighthearted storytelling. Whether you’re sneaking Merlin to safety or playfully throwing him back in jail, this quest sets the tone for an engaging and strategic adventure.

                            As you progress through the game, remember the lessons learned here—creativity and collaboration will be your greatest allies in the challenges ahead.

                            Old School RuneScape: Smithing 1-99 Leveling Guide

                            Smithing is one of the 23 skills in Old School RuneScape (OSRS) and allows players to create weapons, armor, and various other items using ores and bars. It’s a rewarding skill to train as it can be quite profitable, especially if you focus on high-demand items or create valuable products, such as high-tier weapons or rune armor. If you’re looking to level up your Smithing skill from 1 to 99 in OSRS gold, then you’ve come to the right place. This guide will walk you through the best methods, tips, and strategies to efficiently level up your Smithing skill and achieve the prestigious 99 level.

                            Understanding Smithing in OSRS

                            In Old School RuneScape, Smithing involves turning raw ores into usable bars, which are then crafted into various metal items, such as swords, armor, and tools. Smithing can be profitable, particularly with higher-tier bars like rune or adamantite. It also plays a significant role in the game’s economy, especially for players who specialize in making and selling weapons and armor.

                            The experience gained from Smithing is largely based on the item being created and the number of bars used. The higher the level of the bar (e.g., mithril, adamantite, rune), the more experience you’ll gain per item crafted. But training Smithing isn’t just about making items for yourself; you can also make items to sell for a profit, turning this skill into a money-making method.

                            Requirements for Training Smithing

                            Before you begin your journey to 99 Smithing, there are a few important requirements to keep in mind:

                            Levels and Materials: You’ll need specific ores and materials for various Smithing methods. For example, iron, mithril, adamant, and rune ores are essential for progressing through the levels.

                            Smithing Tools: You will need a furnace, an anvil, and, depending on the method, a hammer or mold. There are furnaces available in multiple locations across the game world.

                            Additional Requirements: Some Smithing methods may require specific quests or locations, such as access to the Blast Furnace or the Dwarf Cannon quest for efficient leveling methods.

                            Now, let’s break down the process and suggest the best methods for training Smithing from level 1 to 99.

                            Level 1-15: Smelting Copper and Tin Ores

                            Method: Smelting Copper and Tin Ore into Bronze Bars

                            Experience per Bar: 6 XP

                            Materials Required: Copper Ore, Tin Ore

                            At level 1, your options are quite limited, but don’t worry, the journey gets faster once you progress. To begin, you’ll want to smelt copper ore and tin ore into bronze bars. You’ll need to collect the ores by mining copper and tin rocks, which can be found in places like the Varrock south-east mining site or Lumbridge Swamp.

                            To smelt these ores, go to any furnace and use your ores to create bronze bars. This is a slow but inexpensive method, allowing you to get started with minimal cost. It’s also a great way to earn a small amount of experience and get a feel for Smithing.

                            Once you hit level 15, you will have unlocked the ability to use iron ores, which are more efficient for leveling up.

                            Level 15-99: Smelting Iron Ores into Iron Bars

                            Method: Smelting Iron Ore into Iron Bars

                            Experience per Bar: 12 XP

                            Materials Required: Iron Ore

                            Iron bars are an essential part of Smithing training, and smelting iron ore into iron bars will be your primary method for reaching higher levels.

                            Iron ore is abundant and can be found in various locations across Gielinor, including popular spots like the Mining Guild, Varrock, and Al Kharid. To make the process efficient, it’s best to utilize the Edgeville furnace, which is close to a bank, allowing you to quickly withdraw and smelt your ores.

                            The most notable benefit of this method is that it’s affordable. Iron ore costs less than the higher-tier ores and allows for efficient training. However, it’s important to note that you’ll need to invest a significant amount of time smelting thousands of bars, especially if you plan to train to level 99.

                            Once you hit level 30 Smithing, you will be able to start making iron knives (a popular training method), or you can use the Blast Furnace, which we’ll discuss later.

                            Level 30-99: Creating Iron Knives

                            Method: Creating Iron Knives

                            Experience per Iron Knife: 15 XP

                            Materials Required: Iron Bars, Iron Bar Mould

                            Starting at level 30, you’ll be able to create iron knives by using iron bars. Each iron bar will create 15 iron knives, and each knife gives you 15 experience points. This is one of the most efficient methods for reaching level 99 Smithing, but it’s important to have a high supply of iron bars to make the process worth it.

                            Iron knives are considered one of the most experience-efficient methods for training Smithing, especially when combined with the Blast Furnace method (discussed next). However, keep in mind that this method requires you to have a large stockpile of iron bars, which can be costly to obtain. But when done efficiently, this method can quickly get you to level 99 Smithing.

                            Level 30-99: Blast Furnace Method

                            Method: Blast Furnace

                            Experience per Iron Bar: 137.5 XP

                            Materials Required: Iron Ore, Coal, Blast Furnace Access

                            At level 30 Smithing, the Blast Furnace becomes a game-changing training method, dramatically improving experience rates and efficiency. The Blast Furnace, located in Keldagrim, requires access through the Dwarf Cannon quest, and it offers a much more efficient way of smelting ores into bars. The process requires coal in addition to iron ore, but you can smelt iron ore into bars much faster with the use of the Blast Furnace.

                            The main advantage of the Blast Furnace is the significantly reduced amount of time it takes to smelt iron ores, resulting in a much higher experience rate than standard smelting. Players can achieve over 400,000 experience per hour with the Blast Furnace if they have good familiarity with the mechanics and can manage the furnace properly.

                            While you need a decent amount of resources and effort to utilize this method effectively, the experience gains are worth it, and this will remain the core method for Smithing training from levels 30 to 99.

                            Level 99 Smithing: Creating High-Level Bars and Items

                            Once you’ve reached the higher levels, you will be able to start crafting more valuable items from bars. As your Smithing skill increases, you’ll unlock the ability to smelt and forge bars like mithril, adamant, and rune, all of which can be used to create higher-level weapons, armor, and items.

                            For the most part, you’ll use the Blast Furnace method and transition into making items like adamant arrows, adamant platebodies, or rune items, which can be sold for a profit. Each of these high-level items provides high experience per bar, making them an excellent way to finish your Smithing grind.

                            Cost Considerations

                            Training Smithing to level 99 can be costly, especially if you are using methods like the Blast Furnace or making high-tier items. However, you can recoup some of the cost by selling the items you make, particularly when crafting weapons or armor that are in demand. Keep in mind that you may want to factor in the cost of purchasing ores, as mining them yourself can be time-consuming and expensive.

                            Profitability

                            While Smithing is considered an expensive skill to train, it can also be profitable if you choose the right items to create. Some popular money-making methods include:

                            Making rune items: High-level rune items (like rune platebodies) can be sold for a decent profit.

                            Making adamant arrows: These items are in demand by range-oriented players, so selling them can provide a steady income.

                            Ultimately, the method you choose for Smithing should align with your personal goals, whether that’s maximizing profit or focusing on efficient experience gains.

                            Conclusion

                            Reaching 99 Smithing in cheap RS gold is a significant accomplishment that requires dedication, time, and effort. The training methods outlined in this guide provide various paths to reach the coveted 99 level, with a focus on efficiency and cost-effectiveness. The key to success lies in utilizing methods like the Blast Furnace for faster smelting and transitioning into high-level bars like mithril, adamant, and rune for powerful weapons and armor crafting.

                            By planning your route carefully, gathering the right materials, and staying committed to your goal, you’ll eventually reach the prestigious 99 Smithing level—an achievement that will set you apart in the world of Gielinor. Good luck!

                            Money-Making Methods in OSRS: Hidden Gems for High Profits

                            RuneScape is a game filled with numerous money-making methods, some well-known and others obscure, but all capable of raking in significant OSRS gold if done right. Over the past five years, we’ve tracked these methods, cataloging everything from quirky, offbeat strategies to the ones that push the boundaries of what’s considered “legal” in-game. Today, we dive into some of these unusual methods that can make you a serious GP while offering a fresh spin on traditional money-making.

                            Whether you’re looking for low-effort, high-reward methods or something that might make you question the game’s ethics, we’ve got you covered. We’ve also revamped our “Unusual Money-Making Leaderboard,” providing you with real-time GP values of items and current profitability estimates, ensuring you’re up to date on how much you can earn from each method today.

                            1. Selling Beer to a Child: The Waterbirth Island Shortcut

                            A few years ago, an unusual method emerged on Waterbirth Island involving selling alcohol to a child named Aaladin. While it may seem odd (and borderline illegal in the real world), it’s surprisingly profitable in OSRS.

                            Previously, the method required players to buy kegs of beer from Thor in the Relic Long Haul and trek to Aaladin’s location via a long, tedious route. You would have to run through the Waterbirth Island dungeon, cross obstacles, and use a pet rock to access the area before finally getting to the child to sell your beer.

                            However, recent updates to the game have streamlined this process significantly. A shortcut now allows players to climb directly to Aaladin’s location, bypassing the whole dungeon ordeal. Additionally, using the Lunar Spellbook’s Waterbirth Island teleport and Fenic SE boots grants unlimited teleports to Relica, making this method even more efficient.

                            Starting with 50k, I bought 20 kegs of beer from Thor for 325 GP each (or 9.6k after hopping worlds) and teleported to Waterbirth Island. There, Aaladin buys each keg for 700 GP, making a profit of 7,881 GP per inventory. After just one hour, I made around 506k in profit, proving that this method—though odd—is highly profitable. No other players are involved, and it’s entirely GP-based, which makes it an excellent money-making strategy for both regular accounts and Ironmen.

                            2. Repairing and Selling Broken Blood Moon Armor

                            The addition of new lunar-themed items in the game, such as the Blood Moon and Blue Moon armor, introduced a unique way of making money. These pieces of armor degrade over time, turning into broken versions that can be repaired for a fee. Instead of paying Bob in Lumbridge or Dunston in Birthorp to fix them, which would cost a hefty 1.5 million GP, players have discovered a more profitable alternative: repairing the armor at the player-owned house (POH).

                            With a high enough Smithing level, repairing these pieces yourself at the POH armor stand gives you a significant discount on repair costs—saving you anywhere from 675k to 742k per piece if you have 90 or 99 Smithing, respectively. After purchasing broken Blood Moon armor, you’ll need to keep an eye on market trends to ensure you’re not losing money after repairs. Some days the margins may be tight, while other days, the profit is substantial.

                            For instance, on day one, I purchased 33 broken Blood Moon armor pieces for 75.9 million GP, repaired them for 2.7 million GP, and resold them for 107.7 million GP, earning a total profit of 4.6 million GP. On day two, with the same strategy, I earned 3.28 million GP, showing that, with patience and market awareness, this method can consistently yield impressive returns.

                            3. Hunter Kit Spell and the Huntsman Kit: The Wilderness Method

                            The addition of the Huntsman kit has opened up new ways to make money, especially in the wilderness. While this method may seem like an odd choice for profit-making, it’s one of the most zero-risk methods available.

                            The Hunter kit spell, unlocked on the Lunar Spellbook, allows players to generate a variety of items such as noose wands, butterfly nets, bird snares, rabbit snares, teasing sticks, unlit torches, box traps, and most notably, impling jars. The key item here is the impling jar, which often sells for a high price on the Grand Exchange.

                            To make this method work, you need to be in the Wilderness near the Fountain of Rune, which provides unlimited runes for casting the Hunter kit spell. This eliminates the need to carry extra runes, making the method more efficient. Once you cast the spell, items are stored in the untradeable Huntsman kit. By using the kit’s “deposit all” function, you can rapidly store the generated items and continue casting.

                            After an hour of casting the spell 982 times, I collected enough items to earn a total profit of 1.14 million GP. This method is perfect for rebuilding your bank or completing a high-reward challenge without the risk of losing your items. It’s a fun and surprisingly lucrative strategy, generating over 1 million GP an hour in profits.

                            4. Hop and Shop: Natas Crafting Supply Shop

                            If you’ve ever wanted a simple yet effective money-making method that requires no combat or complex tasks, the “hop and shop” method might be your best option. This strategy involves buying items from shops that restock quickly and then selling them at a profit on the Grand Exchange. One such shop is the Natas Crafting Supply shop, located on the island of Natas.

                            At this shop, you can purchase a variety of items—hammers, needles, thread, balls of wool, knives, and bronze axes—at incredibly low prices. The best part? These items sell in high volume, making them quick to sell on the Grand Exchange. For example, hammers, needles, and thread are sold for 1 GP each, while balls of wool are sold for 2 GP, knives for 6 GP, and bronze axes for 16 GP.

                            The process involves buying out the shop, hopping worlds, and repeating the process. The shop restocks its inventory every 6 seconds, so you can buy large quantities of items in a short amount of time. After spending an hour buying and selling items, I was able to make a profit of 983k. This method requires minimal effort and is an excellent option for both new and experienced players looking to make quick, passive cheap RuneScape gold.

                            Conclusion

                            OSRS is a treasure trove of unconventional ways to make money, and these unusual methods prove that you don’t always have to grind for hours at bosses or farms to see significant returns. From selling beer to a child (with a shocking profit margin) to buying and repairing broken Blood Moon armor, there’s no shortage of opportunities to increase your bank balance.

                            With the right strategy and a little bit of patience, you can take advantage of these hidden gems to maximize your GP per hour. Whether you’re an Ironman or a regular OSRS Accounts, these methods offer high profits with minimal player involvement. So, why not step outside the box and try something different the next time you’re looking to make some easy GP?